Wireless Windows Troubleshooting
If you are having trouble connecting to the wireless network on North Park campus, here are a few troubleshooting steps that may help you resolve certain connection issues.
Forget the Network
- Click the Network icon on the lower right corner of your screen.
- Click Network settings.
- Click Manage Wi-Fi settings.
- Under Manage known networks, click the network you want to delete.
- Click Forget. The wireless network profile is deleted.
Unable to Connect After Windows Updates
If you’re not able to connect to WiFi after applying Windows Updates, please turn off your WIFI adapter and connect via Ethernet for 30-60 minutes. After that time, you should be able to connect normally.
Please contact IT Support Services if you continue to have this issue.
Enable the Wireless Adapter
Some laptops have physical switches to enable or disable wireless on the laptop. Check the sides of the computer to ensure this switch is not in the off position.
Check to see the the adapter isn't disabled by windows software.
- Right click on the wireless icon in the toolbar and select "Network and Sharing center"
- Select "Change Adapter Settings"
- If the wireless network connection is Disabled, Select the option to "Enable this network device".
Install Root Certificates
Most computers already have this installed, however, some non-U.S. windows installs do not have these certificates installed.
- Download the entrust Root CA certificate from the entrust site: https://www.entrust.com/root-certificates/entrust_ev_ca.cer
- Download the entrust Root 2048 CA certificate from the entrust site: https://www.entrust.com/root-certificates/entrust_2048_ca.cer
- Install both by double clicking on both ".cer" files that you just downloaded.
- Please contact IT Support Services if you have any questions about these certificates.
Temporary Account Lock
As a security method, your University credentials are temporarily locked after too many repeated attempts.
If you have typed your credentials incorrectly too many times, or if you computer has remembered incorrect credentials, it is possible that your account is on a timed lockout.
You may contact IT Support Services, or simply wait a 10-15 minutes for the lockout to drop off. You may also:
- Turn your computer/device off, wait a few minutes, and then turn it back on to try again.
- Forget the network (above) and re-add it.
- Some windows 7 users have experienced windows itself locking the wireless adapter instead of the wireless network. Windows locks the adapter for 20 minutes. Follow the same as above, but leave your computer off for longer than 20 minutes.
The lockout time resets each time it receives an incorrect password, so make sure you wait at least 10-15 minutes before trying this method.
Let Windows Control WiFi
Some computers come with custom wireless management software (like "Dell Wireless Manager") and may not have the correct security options required to connect to the network. We recommend:
- Remove any custom wireless management software.
- Reboot your computer for windows to take over control of the wireless adapter.
- Retry the connection steps for your version of windows.
You may want to ensure Windows Updates are complete and that the device driver for your particular make/model computer are correct.
Verify Network Profile Settings
Windows 7
- Right click on the wireless icon in the toolbar and select "Network and Sharing center"
- Select "Manage Wireless Networks"
- Right Click on your North Park Profile, and select "Properties".
- Verify the settings on the "security tab."
Security Type: WPA2-Enterprise- Encryption type: AES
- Network Authentication Method: PEAP
- Select the Network Authentication Method "Settings" Button.
- Verify the Authentication method settings:
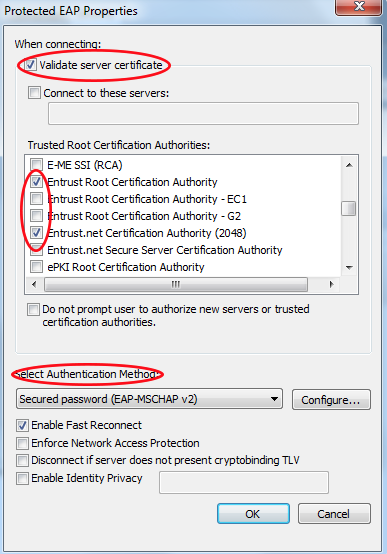
- Validate server Certificate should be checked
- The "Entrust Root Certification Authority" and the "Entrust.net Certification Authority (2048)" should be selected
- (Note: You may have more or less entrust lines in the list. Only these should be selected. If you have duplicates of one specific cert, only one of the boxes needs to be checked.)
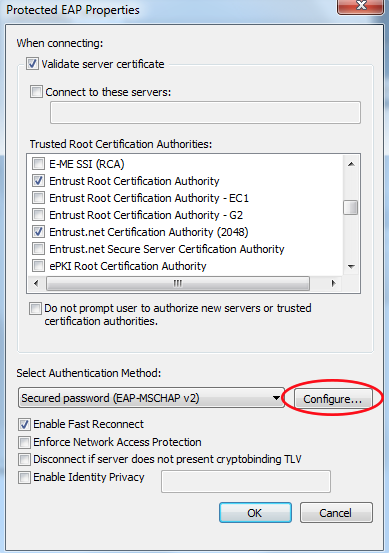
- Select Authentication Method: EAP-MSCHAP v2
- Click on the Authentication Method "Configure" button
- STUDENTS: Ensure that the "Automatically use my Windows login" is UNCHECKED.
EMPLOYEES: On NPU owned machines, this should be CHECKED. On your personal machines, this should be UNCHECKED.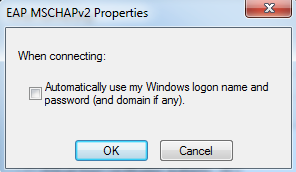
- Work your way out of these additional windows, back to the main window.
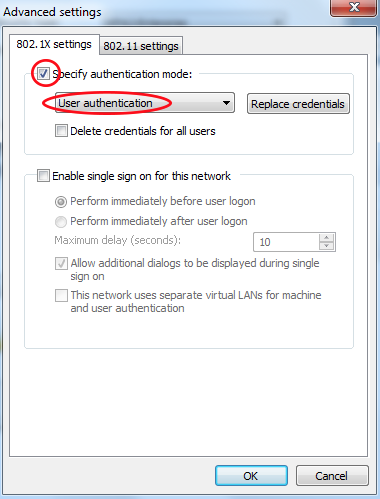
- Select "Advanced Settings"

- Select "Specify authentication mode" and select "User authentication" from the dropdown
- Save all changes.
Run Windows Updates
Windows 7
- Launch the start menu
- Launch "Windows Update" from the program list
- Install any recommended updates
Windows 8 & 10
- Search for "Windows Update"
- Select "Check for updates" from the search results
- Install any recommended updates